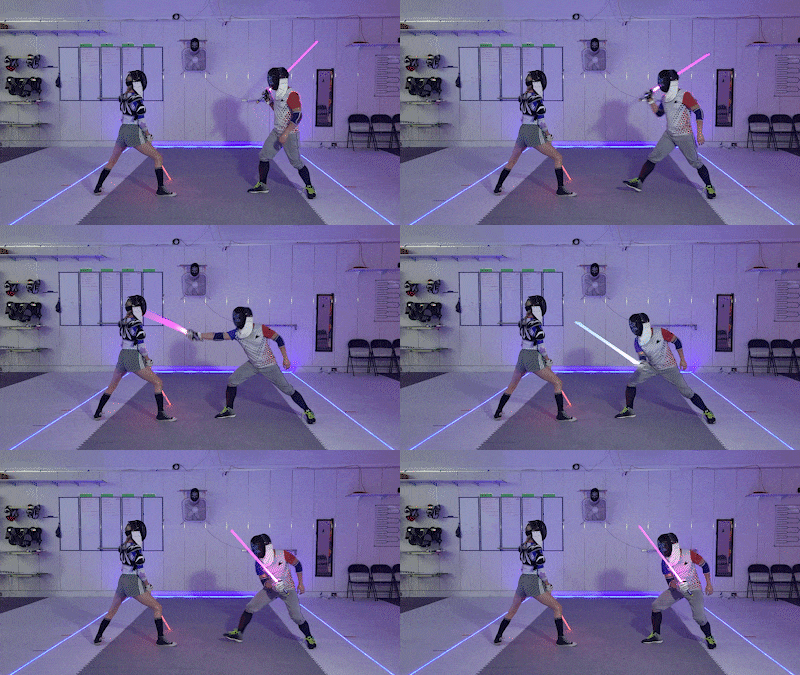
Section 1 taught you the safest but simplest methods. This section shows you how to execute the Tuck Sweep, which allows greater speed with minimal increase in power.
THE TUCK SWEEP
A sweep is an attack that begins on one side of a target and then finishes on the other side. Done with an actual sword, this would result in dismemberment. And, done incorrectly in Lightspeed, this would result in an unnecessarily forceful hit.
The Tuck / Tuck Sweep is a sweeping method that reduces force without reducing speed, by collapsing the arm as soon as the attack reaches its apex.
Tuck Sweeps (left) vs Rigid Sweeps (right). The Rigid Sweep is the most natural method for a beginner to throw a hard attack. But the Tuck Sweep is just as fast, possesses numerous tactical advantages over it, and is much safer.
GUARDS
While not strictly necessary, it helps to understand the guards before learning the Tuck Sweep. A guard is a blade position which may serve as the starting or endpoint of an attack. Guards as endpoints are particularly important to the Tuck Sweep.
REAR GUARDS
These four main rear guards will serve as your starting points for your sweeps.
TUCKED GUARDS
Each rear guard above has a tucked twin, formed simply by turning the wrist over so the blade points forward. These are your attack end points. Your sweeps will finish here.
Note that tucking should occur even if you miss or fall short of the intended target. That’s why you extend to and tuck at the target location, not the target itself. If you don’t tuck until you hit something, your tuck will always be delayed.
GENERAL PROCEDURE
Let’s look at the the general form of the Tuck Sweep.
From your starting guard (for the purposes of this tutorial, a rear guard):
Extend your attack to the target’s location.
At the target location, withdraw (tuck) the weapon to a tucked guard.
examples
High laterals
Start @Cape → Extend → Tuck to Horn
Start @Cloak → Extend → Tuck to Mask
Mid laterals
Start @Scabbard → Extend → Tuck to Holster
Stasrt @UpWing → Extend → Tuck to Spear
Dives (downward diagonals)
Start @Cape → Extend → Tuck to Spear
Start @Cloak → Extend → Tuck to Holster
Risers (upward diagonals)
Start @Scabbard → Extend → Tuck to Mask
Start @UpWing → Extend → Tuck to Horn
common guard-to-guard tuck sweeps
What-to-do and what-not-to-do.
Dives from Cloak Guard. Tuck on the left: Cloak → Extend → Holster
Dives from Cape Guard. Tuck on the left: Cape → Extend → Spear
Flats from Scabbard Guard. Tuck on the left: Scabbard → Extend → Holster
Flats from Server Guard. Tuck on the left: Server → Extend → Spear
Risers from UpWing. Tuck on the left: UpWing → Extend → Horn
Risers from Scabbard Guard. Tuck on the left: Scabbard → Extend → Mask
Notice how excessive force attacks start and finish in rear guards, while properly metered attacks finish in a tuck.
common mistakes
Failing to perform the tuck results in a rigid sweep. A sweep performed at even moderate speed can be excessive when done with rigid arms.
If your blade has hit the floor or your blade tip is to your side or behind you, that’s a good sign that you failed to tuck.
Proper tuck (left) vs poor/no tucks (right). The fencer on the right is waiting to hit something before tucking. He is going to hit his opponent with full force and not understand why he was penalized. Tuck when your blade reaches the target’s location, NOT when your blade reaches the target.
A sweep tucked too late is virtually the same as not tucking at all.
A common error is underextending or going directly from the start to the tuck (right). This will render the attack largely ineffective.
OTHER TECHNIQUES
With these alternative movements, skilled practicioners have a lot of competitive freedom!
Short Tucks. You absolutely can throw a sweep from a forward pointing guard such as Makashi. These are even safer and also faster.
Long Percussives. Percussive cuts accelerated from around 90° or more.
Yielded Sweep. This attack is delivered with a “yielded wrist” (note the blade and arm almost form a 90° angle on contact), though it is not very competitive.


